Step-by-step guide to hatching eggs at home.
Temperature and humidity inside the incubator are critical factors for successfully hatching eggs. Suggested guidelines are as follows:
Hatching Eggs at Home: A 21-Day Guide for Baby Chicks
- Optimum temperature: 100.5 degrees Fahrenheit
- Temperature range: 99-102 degrees Fahrenheit
- Don’t let the temperature drop below 99 degrees Fahrenheit
- Do not allow temperatures of 102 degrees Fahrenheit to last more than a few hours
- Double-check the incubator’s thermometer with a medical thermometer placed nearby to ensure the gauge is working properly.
- Relative humidity, day 1-17: 50-55 percent
- Equivalent to a wet bulb temperature of 85-87 degrees Fahrenheit
- Keep water channels in the incubator full to facilitate proper humidity
- Relative humidity, day 18-21: On day 18, raise the relative humidity to 70 percent
- Use a hygrometer to ensure humidity levels are correct throughout the incubation period
- Only open the incubator when necessary – doing so can let heat and humidity escape and can affect the success of the hatch.
- Increase ventilation as embryos grow bigger, especially from days 18-21.
“What’s’ If European Brahmas are going to make everything around your backyard Majestical, that will be Aesthetic Appeal.”
— Mery Brahma USA
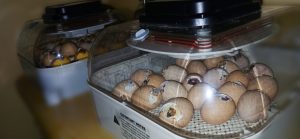
Day 1: Setting eggs
Once you have the incubator set up and have analyzed the settings to ensure accuracy, you are ready to place the eggs inside the incubator. This process is called “setting the eggs.”
Plan to set a minimum of six eggs at one time. Setting fewer eggs, especially if the eggs were shipped, often results in one or no hatchlings. The number of chicks that hatch together is especially important for the newborn chicks because chickens are flock animals and need companions to be happy. Place the eggs in the egg tray of the incubator, with the larger end facing up and the narrow end facing down in the incubator. Set the temperature to 100.5 degrees Fahrenheit with 50-55 percent humidity.
Day 1-18: Turning the eggs
After setting the eggs, the incubation process begins. An important part of this process is turning, or rotating, the eggs.
Eggs must be physically turned to prevent the developing chick from sticking to the shell. More scientifically, the embryo should be resting on top of the yolk. The yolk tends to float upward, on top of the albumen (egg white) towards the shell if the egg is not turned. As a result, the developing embryo can be squeezed between the yolk and the shell, causing potentially fatal damage. By turning the eggs, the yolk turns within the albumin, once again moving the yolk away from the shell and making it safe for the embryo on top until it is time to turn again.
Eggs will need to be turned a minimum of 3 times per day, and 5 times is even better. If you are turning the eggs manually, it is advised to gently make a mark with a pencil (never a pen!) that will help you keep track of which eggs have been turned. If you have an automatic incubator, it should turn the eggs for you and will eliminate the need to repeatedly open the incubator (check the user’s manual).
Be sure to wash your hands or wear clean gloves before you touch the eggs to prevent the transfer of skin oils or germs to the developing chick.
Days 7-10: Candling eggs
Towards the middle of the incubation period at 7 to 10 days, eggs can be candled to determine if the embryos are growing properly.
Candling is the act of simply shining a light through an egg. White and light-colored shells are the easiest to candle, while darker shells will require a brighter light. The simplest way to candle an egg is with a basic flashlight, but there are specialized pieces of equipment designed specifically for the job. Do not keep the egg out of the incubator for more than 5-10 minutes, and don’t candle the eggs all at once. To allow the eggs to stay inside the incubator, plan to candle a few at a time.
To understand what you are looking for while candling eggs, read the following description from extension.com:
- If the inside of the egg is clear – that is, free from visible structures or dark areas – the egg is infertile, or the embryo died very early. Remove this egg from the incubator.
- If a ring of red is visible within the egg, there was an embryo at some point, but it has died. Remove this egg from the incubator.
- If you can see blood vessels within the egg, there is a live embryo inside. Blood vessels in chicken eggs are normally observable within 7 to 10 days of an egg’s incubation. By 18 days of incubation, the embryo takes up most of the egg and appears as a dark area within the egg. You can sometimes see movement inside the egg.
If you notice broken or leaking eggs, remove them from the incubator as they are not likely to be viable and may contaminate the incubator. After candling, return eggs to the incubator and return to the day 1-18 turning schedule.
Days 18-21: Pre-hatching
By day 18, the embryo has developed into a chick and will take up most of the space in the egg. The chick is preparing to hatch. You can do a few things to best help the baby chick prepare:
- Stop egg-turning at day 18 with the larger end of the egg facing up. At this point, the chick will position itself for hatching inside the egg.
- Maintain a temperature of 100.5 degrees Fahrenheit but increase humidity to 70 percent.
Day 21: Baby chicks start hatching
Chicks will typically hatch at day 21. If the fertilized eggs were cooled prior to incubation, the process might take a little longer. If you are at day 21 with no hatch, give the eggs a few more days.
When the big day comes, let the chick hatch on its own. Do not attempt to help. Blood vessels that haven’t dried up yet may still attach the shell to the chick, and prematurely pulling of the shell can cause excessive, potentially fatal, bleeding. A chick can take up to 24 hours to completely hatch, although 5-7 hours is more common.
The peeping of the new baby chicks will encourage unhatched eggs to also start hatching. When the chicks have all hatched, the incubator temperature can be lowered to 95o Fahrenheit. Once the chicks have dried, they can be moved into the brooder, which should already be up and running with a temperature of 90-95o Fahrenheit. Food and water should be in place as well.
If there are still unhatched eggs at day 21, don’t despair. It is possible that timing or temperature went slightly awry, so give the eggs until Day 23. Candle any unhatched eggs to see if they are still alive before discarding them.
Hatching eggs can be a very rewarding experience with proper planning and equipment. Remember to test all equipment before fertilized eggs arrive and set up the brooder as hatch day approaches.
Keep a watchful eye on temperature and humidity inside the incubator and invite friends and family over to watch the hatch. Everyone will be enthralled! Best of all, enjoy the new exotic flock members you have had the privilege of raising, Exotic Hatching Eggs  from birth.
They’ve hatched! Here’s ( what to do once your baby chicks arrive. )
Exotic and Rare European Brahma Varieties:
- Blue Porcelain: A soft blue-grey, which and creamy base, light brown.
- Millie Fleur: reddish brown back feathers paired with bay colored breasts and glossy black tails.
- Red Porcelain: Darker tip reddish Solid, deep-brown, creating a striking speckled appearance.
- Lemon/Lemon Pyle: A yellowish-buff with white or black markings.
- Isabel (Lavender/Buff): A rare, soft, pale buff or diluted lavender color.
- Blue-Colombian: Pattern with blue replacing the traditional black in light brahma markings.
- Mottled: A black base with white speckles distributed across the feathers.
- Red Pyle: This beautiful exotic chicken is a rare breed. Red Pyle is a distinct and striking coloration that can be difficult to find as a true-breeding bird.
Get In Touch With Us, WhatsApps!
Contact Us
Book By Appointment
Monday, Friday 11:AM – 5:PM Saturday 11:AM – 2:PM Sunday Closed Delivery info: Pickup